Statue of Liberty Celebration Art Lesson for Kids


In honor of Independence Day, let us celebrate Lady Liberty!
Here is what you will need to create this fun work of art
Recommended Art Materials:
White drawing paper 9x12
Pencil
Eraser
Faber-Castell Pitt Artist Pen - Black Extra Superfine
Paint brush
Cup of Water
Paper Towel
Faber-Castell Connector Paints
The History of the Statue of Liberty:
On July 4, 1884 France presented the United States with an incredible birthday gift: the Statue of Liberty! Without its pedestal it is as tall as a 15-story building. This statue represents the United States. But the world-famous Statue of Liberty standing in New York Harbor was built in France. The statue was presented to the U.S (United States), taken apart, shipped across the Atlantic Ocean in crates, and rebuilt once again, in the U.S. It was France’s gift to the American people.
The French group decided to build a monument to American freedom—to try to strengthen French demands for democracy in their own country. Sculptor Frédéric-Auguste Bartholdi imagined a statue of a woman holding a torch burning with the light of freedom.
Turning Bartholdi’s idea into reality took 21 years. French supporters raised money to build the statue, and Americans paid for the pedestal it would stand on. Finally, in 1886, the statue was dedicated.
Some fun facts:
- The statue sways 3 inches in the wind; the torch sways 5 inches.
- Visitors climb 354 steps (22 stories) to look out from 25 windows in the crown.
- The statue—151 feet, 1 inch tall—was the tallest structure in the U.S. at that time.
- Frédéric-Auguste Bartholdi knew he wanted to build a giant copper goddess; he used his mother as the model.
- The statue is covered in 300 sheets of coin-thin copper. They were hammered into different shapes and riveted together.
- The arm with the torch measures 46 feet; the finger, 8 feet; the nose, 5 feet.
How to:
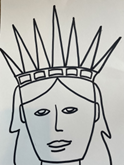
Begin with a white piece of drawing paper and a pencil and hold your paper vertically. We will be creating our drawing based on a step-by-step process. Thank you to Art for Kids. The pics shown are all in black permanent marker, so you can see the images. We suggest drawing in pencil first and then going over all your pencil lines with your black Pitt pen marker.


Please note we added oil pastel star like shapes to represent fireworks for the 4th of July! This step was done after going over our pencil lines in black permanent marker.

Use the Faber Castell oil pastels for the fireworks, please note any color will work and the more colorful the better! It is up to you to create the design. Feel free to make any adjustments in Lady Liberty, you see fit. Once the drawing is complete PRIOR to adding the oil pastels, I suggest going over your pencil lines with your black Pitt-pen. This will help to not have the oil pastels smear. Once you have added your firework designs, let’s start painting. I used a mix of the two green shades in my 12 count Faber Castell paint set to get the green shade shown above. I painted in the statue area first and then worked on the background to create a night scene with the fireworks. I used black paint with a very wet brush in order to get a light black shade. This way, the oil pastels resist the paint and show through. It is a wonderful effect to mix watercolor paint and oil pastels. I hope you get future opportunities to work with these materials together as there is so much fun to create!
Happy 4th of July! Celebrate and Stay Staff-Keep Creating!
-Amy Friedman