Watercolor Marker Tips & Techniques with Goldfaber Aqua Dual Markers


Goldfaber Aqua Dual Markers were created for the crafters and artists who love taking on a multitude of creative trends. While there are many qualities that make these markers stand out, perhaps their best feature is their versatility. Discover all of the ways you can create with Goldfaber Aqua Dual Markers!
Double Nib Design:
Before getting started, it’s important to understand the functionality of the Goldfaber Aqua Dual Markers. With their double nib design, each marker is created with a brush nib on one side, and a fineliner tip on the other. Flexible but durable, the brush nib can create lines from 1mm to 5mm depending on the angle and pressure applied to the marker. The fineliner tip creates a 0.4mm tip perfect for sketching, hatching, and adding other small details.

3 Techniques for Lightening Marker Color:
- Add water from a water brush directly to the marker ink on paper. Control the lightness of the paint by the amount of water you add. The more water – the lighter the color.

- Apply marker ink to a waterproof surface, such as a plastic sheet, an acrylic mixing palette, or a porcelain plate. After, dilute the paint with water from a spray bottle or water brush. Come back with a paint brush to pick up the diluted ink to apply to your paper.

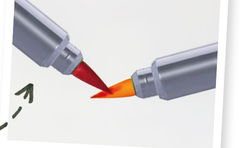
-
Press the tip of a water brush to the tip of the marker. The marker will absorb the water and produce a lighter shade of color when you apply to paper. It will become dark again as the ink flows.

3 Techniques for Darkening Marker Color:
The transparency of Goldfaber Aqua Dual Markers makes them easy to darken!
- Apply multiple stroke layers of the same marker color. The more you layer, the darker the color will get. Be sure to wait until the layer is dry before adding another.

- Break up color tones by painting over the original color with a second darker color or grey.

- Similar to the lightening technique, press the tip of a lighter marker and darker marker against each other. The ink from the dark marker will flow into the tip of the lighter marker, they will mix and form a darkened color tone.

Painting and Writing with Two Colors:
This is the perfect trick for hand lettering!
Apply the ink of a darker color marker to one side of the brush nib of a lighter colored marker the result is a two-colored stroke. Don’t worry, you can clean your brush nib after by wiping it on paper, using a cloth, or rinsing it.

3 Techniques for Creating Single-Color Gradient:
Achieving a gradient affect may look professional and difficult to achieve, but it is quite simple.
- To make a single-color gradient from light to darker, hold the marker tip under running water. *This technique will cause the color tone to become progressively intense while painting due to the ink flowing in – causing the gradient affect.
- Partially cover an area with ink and then use a water brush to spread the color.

- Use a blending pen. Its transparent liquid will dissolve the ink so that it is diluted and can then be spread.

3 Blending Techniques:
Blending is a way to create color gradient between two or more colors.
- Apply a lighter color over the entire surface and let it completely dry. After, apply the second darker color and use a water brush to blend it into the more transparent area so that the colors visibly run into each other. If you have too much dissolved ink, remove it with a cloth.

- Apply a lighter color over the entire surface and apply the second darker color to a plastic film. Pick up the darker ink from the plastic film with the brush nib of the lighter colored marker. When writing or painting, the marker will first release the dark color, then gradually fill with the lighter color.

- Color two areas of different colors a small distance apart and use a water brush to bring the lighter color towards the darker color. After, dissolve the darker color and move it toward the lighter color. Repeat these steps to work the colors into each other.

These techniques are only the beginning to what you can achieve with watercolor markers. For more tips and techniques, download our brochure. Shop Goldfaber Aqua Dual Markers here and be sure to share how you use your markers by tagging us on Instagram, TikTok, and Facebook.