Hand Painted Holiday Card Tutorial

In this tutorial, we make bold and colorful hand painted Holiday cards, using a watercolor pan. This premium quality 48 color watercolor paint set includes a water tank brush and comes in a sturdy plastic case with an easy to clean palette in the lid, perfect for all ages.
Recommended Art Materials:
gold metallic paint
1/2in oval wash paint brush (for petals)
#2 round brush (for finest detail)
stiff brush (for white spatters)
Exacto knife
18x24 watercolor paper
scrap cardboard for making cropping L tool
colored card stock (for mounting art)
palette or bowls for paint mixing
water for rinsing brushes
paper towel
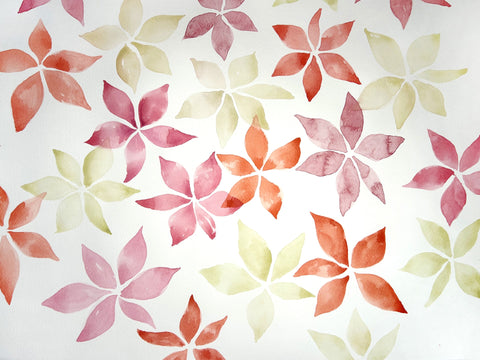
Painting the first layer
I begin by mixing 3 different colors; a watery red, a crimson, and a cream. I then paint the first and lightest layer of Poinsettia petals all over a piece of 18x24 watercolor paper. I use my special brush to start at the tip of each petal and paint the whole petal in 2 strokes, keeping it clean and light. I let it dry.
Tip: Using the right brush makes a world of difference in achieving an ideal result. The brush recommended here for painting the Poinsettia petals is designed with a fine point and tapered edge to allow for easy and smooth precision.

Painting the second layer
Here I add the darker petals ( same color, a little less watery) in irregular number and shape. This makes each flower appear more natural and interesting. I let it dry.
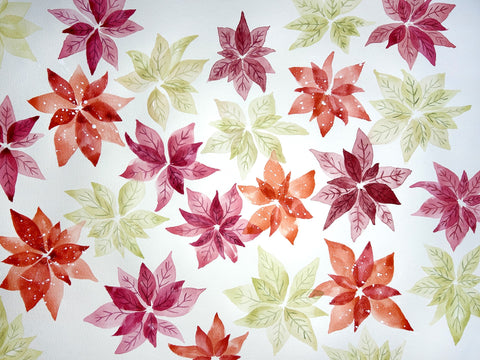
Painting veins and spatters
At this stage, I use my smallest round #2 brush and paint the veins of the leaves. The darker vein color is the same color as the flower, just less watered down. (The veins of the cream colored flower has a little green added.)
I decide to jazz up the overall design by making the red flowers an actual Poinsettia variety called Red Glitter, featuring its fun white flecks and markings. For this, I first protect the surrounding flowers with whatever scraps of paper or napkins I have around. I then carefully dip a stiff brush into a thin acrylic paint mixture and flick it with a sharp wrist motion across the red flower. I do not add veins because I think it would be too much.
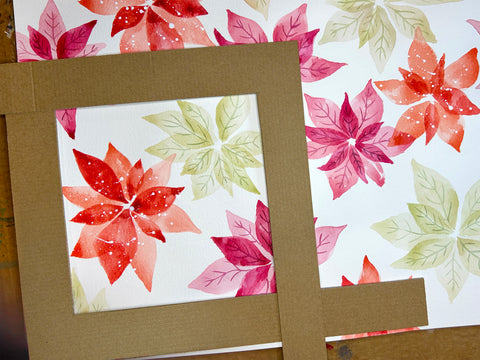
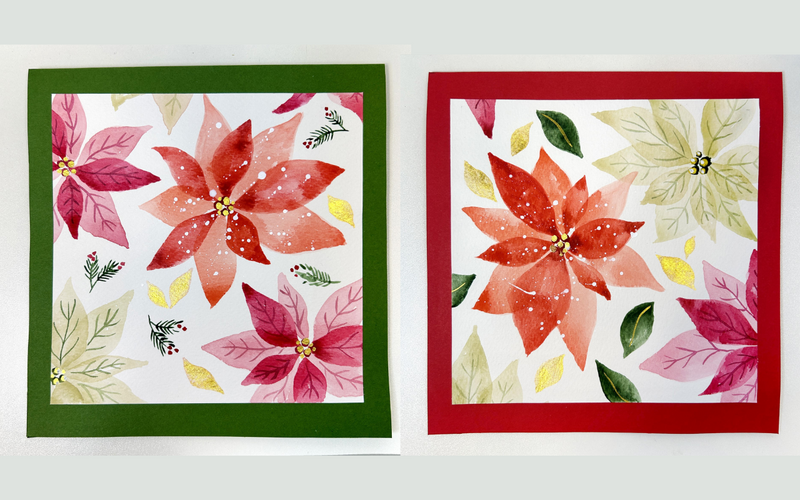
Cropping
Here I use my cropping Ls to find the best compositions for the painted card fronts. I decide that a square format is the more modern look that I want. I mark the corners lightly with a pencil and then use a straight edge and a sharp Exacto knife to cut the artwork out.
I get several cards out of this one big sheet of painted paper.
Tip: Cropping Ls are simply 2 pieces of cardboard cut into L shapes that are used at 180 degrees to each other forming a window that can be adjusted in size and proportion.

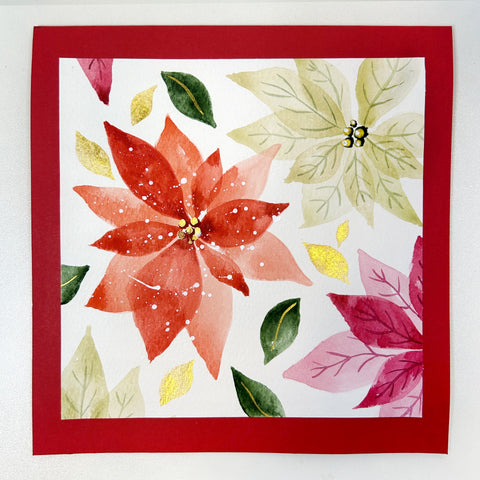
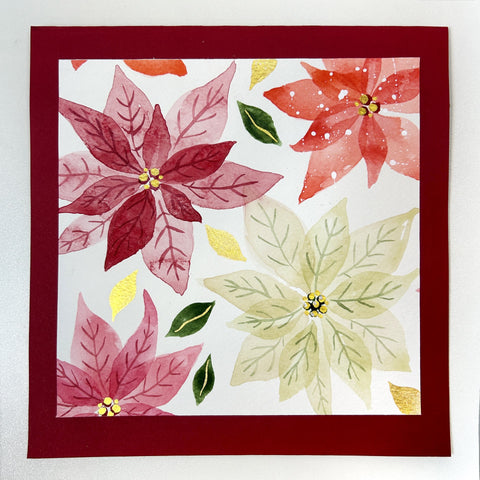
To these 3 cards, I add combinations of little pine sprigs with red berries, green leaves, gold accent leaves and flower centers.
I mount (glue) the art on folded card stock giving it a 1in frame.
As for the inside, I would handwrite my message, or, you could consider designing and printing out your message from a computer, cutting it out and mounting it.
A hand painted Holiday card is a very special, personal and much appreciated thing for friends and family to receive; almost a gift in itself! Enjoy the process of both making and giving, and as always, enjoy the season, and have fun making art!