Hocus Pocus it's Fall! Art Lesson for Kids


Art lesson at home for kids
Imagine, create, experiment and discover. Art is where children learn to express ideas and feelings, solve problems, and develop self confidence and self discipline. You can nurture and develop an interest and passion for creative thinking in your own children right from your own home. All you need are some basic art supplies, time, and a kitchen table.
Presented here, are simple and fun literature and art projects offering a rich and creative experience for your child, and are very simple for you to guide. Enjoy!
Materials:
Faber-Castell Jumbo Beeswax Crayons
Faber-Castell Connector Paint Box
Faber-Castell Construction Paper
8 1/2 x 11 copy paper
Flat paint brush, glue, scissors
Vinyl tablecloth or newspaper
The book,“Hocus Pocus, It’s Fall!” By Anne Sibley O’Brien
Vocabulary:
Blade
Veins
Petiole
Collage
Watery Consistency
Light-handed
Texture
Make an example of the art:
Besides creating an example to inspire your child, taking the 30 minutes to follow the simple steps and make the art yourself allows you to experience the art processes and any potential pitfalls. It will enable you to guide your child through the project with confidence and experience, easing any complications or stress, thus creating a successful experience for both of you.
Set up:
Prepare your kitchen table for an art project! An old re-usable vinyl table cloth works best for protecting the surface and providing a water-proof background. It can later be wiped clean, or left dirty (with dried paint), and folded up. Old newspaper will also do, although it can slip around, and paint or water can soak through. Set out all of the materials for the art project.
Reading:
Establish a comfortable place for reading, and read aloud, “Hocus Pocus, It’s Fall!” to your child. Share the illustrations, and discuss the excitement and surprise of fall’s arrival, and how it is a season of transition.

1. Collect your leaves
Take a walk with your child, and observe and collect a few different types of leaves for your project. Find leaves that have not dried and changed color yet, they will be easier to use for the crayon rubbing. Show your child how to position a leaf with the vein side up under a piece of white copy paper.

2. Making your leaf rubbings
Show your child how to rub the side of a crayon (red and brown work best) firmly over the entire leaf making sure to catch all of the leaf’s edges. Voila! It is very surprising to see the image of the leaf appear with all of its beautiful detail!
You can take this time to get a little scientific observation in by teaching your child about the different parts and functions of a leaf:
Blade – the flat part of the leaf
Veins – the lines that run through the blade Petiole – the stock of the leaf

3. Painting your leaves
Show your child how to add a bit of water to the yellow, orange and green, giving it a watery consistency, and paint the leaves in a very light-handed way. Make quick strokes here and there, leaving spots of white. Be careful not to add too much paint, this paper is not meant to be able to absorb it. Let dry.
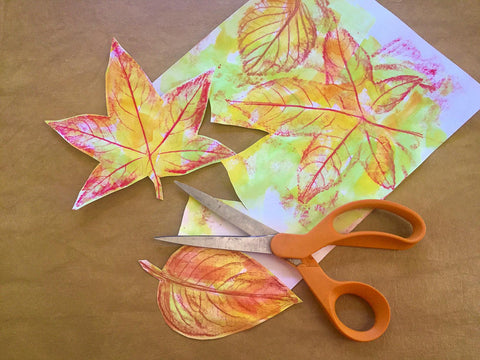
4. Cutting out your leaves
Show your child how to cut out the leaves. Cut just outside the leaf outline.
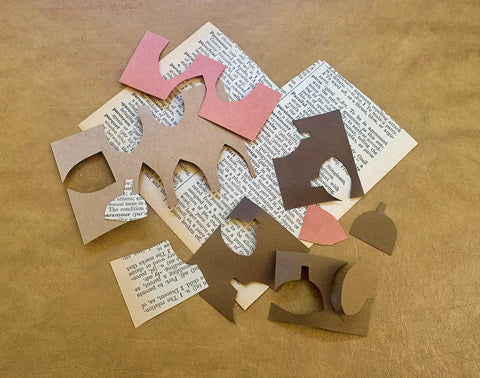
5. Making your acorns
Show your child how to cut out the acorns freehand. Cutting from a small scrap of paper is easier for small hands to handle. Your child’s acorns will be quirky and cute, reassure them that they look great! Cutting some of the acorn caps out of old newspaper scraps add fun texture and interest. Attach the two pieces of the acorn with a dot of glue.

6. Making your background
Have your child choose a piece of colored paper for the background, and show them how to add “swirling wind” lines with a crayon. A white crayon shows up best on a dark background and any color crayon will show up on lighter backgrounds.
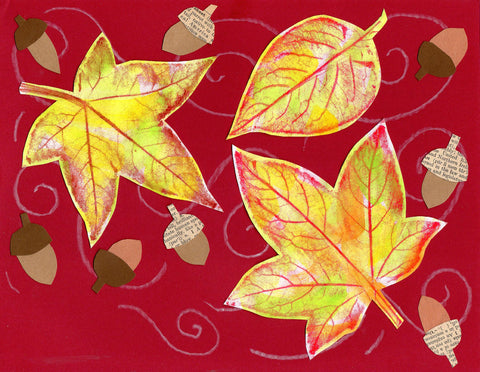
7. Assembling
Finally, show your child how to glue their leaves and acorns to the background. Encourage them to think about the placement of the leaves and acorns by discussing how they fall from trees in all different directions.
Your fall masterpiece is complete!
Download the entire lesson plan, here!