A Foxes Walk in the Woods Gelatos Art Lesson Plan


An art lesson plan inspired by a nature walk in the woods!
Gelatos are a unique coloring medium in the form of compact pigment sticks that glide onto paper and other materials. Infused with brilliant, creamy color, they can be used dry or dissolved with a wet brush to create beautiful watercolor effects.
In this lesson plan, we explore the basic steps in creating a vibrant and dynamic cut paper-collage, inspired by nature from my walk in the woods of Maine.
Faber-Castell Materials Used
Oil Pastel Crayons - Box of 12
Connector Paint Box - 24 Colors
6 Assorted Triangular Paint Brushes
Black Pitt Artist Pen - Medium
Also used in this collage but not pictured, is Faber Castell Construction paper (natural toned sheets for fox, birds and leaves) a sheet of 19.5 x 25.5 Strathmore 400 Toned Mixed Media Paper in Tan for the background, and more brushes.
Inspiration: An October Walk in the Woods

Every October I look forward to walks in the woods not far from our summer cottage in Maine. These dark woods are alive with the rustling and delicate sounds of nature; bird song, watchful deer, a raccoon clinging to a tree limb.
Up ahead there is a clearing, and it is there one morning, where a big red fox darts across my path. Voila! The inspiration for this collage presents itself.
The Art of Cut-Paper Collage
To make a collage is a very creative and enjoyable process. The beauty of this art form is that it is so flexible and forgiving that there are really no mistakes, nothing that can’t be easily corrected or improved. You can almost design as you go, watching your art slowly evolve with new and surprising ideas being triggered by an unexpected color, piece of scrap or scribble. Let yourself go here, by taking your time experimenting with colors, shapes and ideas. It is the unexpected discovery and “happy accident” that make this so fun.
Set up a work space where you can leave your unfinished collage and materials out over the course of several days so you can revisit it with fresh eyes, seeing new ways to improve it and continue. Study, learn and be inspired by the work of other collage artists like I have, like Eric Carle, Chris Hagan, and Mark Hearld, to name just a few.
The nature of cut-paper collage offers a wonderfully playful, charming quality, with refreshing and impressive results.

The Sketch
In this first step, I get my basic idea down on paper by making a few small pencil sketches working out the best composition of just the basic elements. I arrive at this very loosely drawn final sketch that will serve as my guide. All other detail will develop as I work.
I choose a large 19.5 x 25.5 sheet of Strathmore Mixed Media Paper in Tan. This color will provide a warm, earthy foundation, guiding color choices and setting a certain aesthetic fitting for depicting the woods. This toned paper plays an integral role in the art’s final outcome, unifying the artwork with it’s color and texture by peeking through the Gelatos and paint in areas. The larger paper also provides ample room to design my collage at a more comfortable size where it is easier to cut, paint, position and play with all of the elements more freely.

Jumping in with Gelatos
I begin with the background layer of the collage by scribbling broad sweeping strokes with the Gelatos. I use a few different colors to depict the earthy tones of the woods and cool October sky.
I then soften and blend some areas of the color with a large, flat brush, using just a bit of water, leaving some of the dry scribbles visible. The unexpected and interesting look of the scribbling convinces me to leave it as the artwork’s edge.
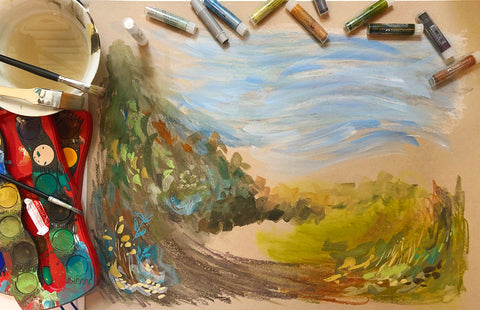
Adding Connector Paint
In this step, I paint woodland flora in a loose, abstract way, dabbing muted colors of an undefined background in some areas, and more defined grasses and small organic shapes in others. I experiment on scrap (toned) paper, looking for colors that will pop and compliment each other. I use a medium round brush. Using a large flat brush, I swirl some light blue paint through the sky, being careful to allow a bit of the paper to show through.

Creating Wind
Here, I create a gusty, exciting October sky by adding wind, using the side of a broken, white oil pastel stick. Starting on the left side of the paper, I press down hard, dragging the pastel across the sky in a curvy motion that I imagine as wind. I then add additional marks with a metallic blue Gelato. Be careful to not overdo. Leave parts of the plain paper showing through; this helps to give the sky an airy, transparent feel.
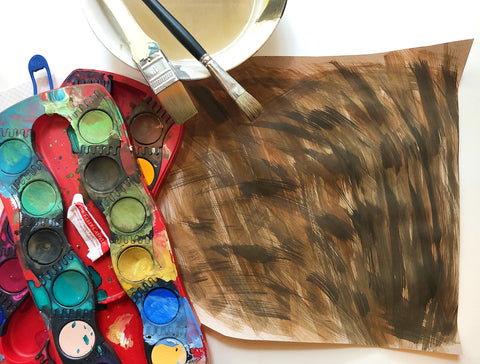
Making the Tree
Next, I want to create the large foundation shape of the tree. Using the Connector Paint browns and ochre, I paint a piece of paper (same kind of paper used in the background) with a drybrush technique. This effect is achieved by using a large flat brush that is relatively dry, yet still holds a little paint. The resulting brush strokes have a characteristic scratchy look which is quite successful in representing rough tree bark. I paint strokes in a few different directions, with the tree branches in mind.

Cutting Out the Tree
Here, I cut a stencil of the tree to use on the painted paper. The stencil is brown paper, because I originally planned on using it as the tree, until I realized that this painted paper would look much better. I also prefer tracing on the front of painted paper so I can position the stencil to catch the best parts of the painted effect. I carefully outline the stencil with a white pencil.

Here, I simply cut out the tree with sharp scissors, patiently turning the paper as I cut, so as to get clean edges and be able to get into the small areas.

Making the Fox
To make the fox, I begin by sketching him to size on tracing paper. I then transfer the drawing onto a toned piece of construction paper using a light box; you can also use a bright window. I make the head a separate piece, so that I can have flexibility in positioning it. Because the fox’s length is too long for the paper, the tail is also a separate piece taped to the body from behind. I cut him out about 1/8 of an inch outside the pencil outline.

Painting the Fox
In this step, I begin by lightly coloring the fox first with Gelatos, carefully allowing the paper to show through here and there. I then lightly add paint, combining the two mediums with my wet brush until I get the desired effect.
I make the eyes separately for better positioning, using a black Pitt Pen and yellow Gelato.
I use the dark brown paint with a small round brush to lightly outline areas of the fox and add individual brown hairs. I use a white Pitt Pen to add areas of white fur and more individual white hairs.
Finally, I use my scissors to create more of a fur effect by making small cuts along the tail and head. This adds a lot to the final effect.

Middle Ground
As I play with positioning my finished tree and fox onto the background, I realize that I need to do something with the middle ground area. I decide that I can fill the space and add depth and distance to the scene by making two separate hills with Gelatos, a lighter green for the closer hill, and a darker green to depict the hill further back.
I carefully position the hills planning for the bottom edges of the shapes to be covered by the fox’s tail. I notice that there will also be an exposed edge in the center of the scene where the hills meet the painting. I plan to hide the spot with a large falling leaf.

Making Leaf Rubbings
Here, I make good old fashion leaf rubbings we all might have done as a kid. I begin by simply placing a leaf vein side up, under a piece of natural toned construction paper. I rub the side of a crayon, (red and brown work best) firmly over the entire leaf making sure to catch all of the edges. It is amazing how the leaf appears in all of it’s beautiful detail.
Next I lightly add a bit of sparkle with a couple of the Iridescent Gelatos, by picking up a little color off the top of the Gelato stick with a round wet brush. I dab the leaf with color in a very light-handed way. After drying, I cut the leaf out, right outside the crayon’s edges.

Adding Pieces
In this step, I cut detail pieces out of painted paper that I have made with both the Gelatos and Connector Paint. I cut freehand, not following any outlines, designing the pieces as I cut. This method is very fun, and always brings unexpected and surprisingly beautiful results, triggering new ideas for the scene. The maroon and chartreuse colors are so pretty, that I decide to add them to the foreground of the scene. The birds are painted on the natural toned paper like the fox and leaves.

Assembly
And now the time has come for final touches and to position all of the elements in their final place. I lay all the pieces down before using glue, making sure to cover any unwanted areas exposing rough edges (behind the fox’s tail and behind the large falling leaf.) I position the fox’s head to look just right. I will mention here, that I made a new head with a longer snout, (a good reason to make the head separately.) I position plants in the foreground to add a bit of depth. I “wake up” the lower right corner by adding a few brightly colored berries to the grasses.
Finally, I add a bit of interest and subtle dimension to the overall look of the collage by applying my bead of glue well within the edges of some of the pieces, thus creating small drop shadows throughout the art.
Download the entire art lesson, here!
